Showing posts with label Graphic Design. Show all posts

Wednesday, December 16, 2015

Gestalt Principles

Similarity
www.andyrutledge.com/gestalt-principles-2-similarity.php


   This article was about the Gestalt Principle of similarity and different ways we perceive
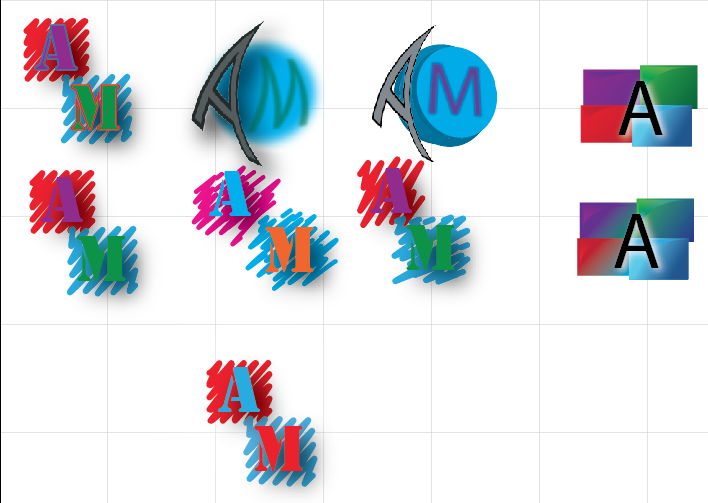
similarity as well as how this can be applied to web design. The author states that shape,
size and color are fundamentals of this principal which can then be applied to links, page
content, and organization in web design. Similar shapes will seem to be linked even when
 jumbled around with others. The same goes for color and size. The articles' strength lies in
 its' usage of images which help the reader visualize the similarities. It also has strong
organization which is used by heading separate paragraphs with question to tie the paragraph
 to the picture. However, the author concludes with saying that this principle is simple but it is
 ok for a design to be complex.


Continuation
http://blog.templatemonster.com/2012/04/19/gestalt-continuity-law-templatemonster-templates/

   This article is about how continuity can be applied and how it works in our minds. It talks
 about how our mind continues pattern seen even if the pattern physical ends. Like how we
 might see four coverging lines instead of two lines that intersect if each part were colored
 different. Another way continuation works is when we see items placed in a row our minds
tend to group them together. Placing certain items a bit to the right causes our minds to see
 them as subheadings. We also follow objects that guide us to a certain spot. For example, if
 there was a picture of someone looking to the right you would look to the right.  Or if someone
 is pointing you would look where they point.


Closure
http://www.andyrutledge.com/closure.php

    This article relates closure to more than just design. It is used to create a hole picture that makes sense even if it's not there. The article uses the example of Patton's fake army. A German general put an enormous army at Calais to defend against an army that wasn't coming. He had gotten bits of information which he put together in order to make sense of them. However, instead of the enemy attacking at Calais they attacked at Normandy. This is an example of closure in a situation in design it can be used to create an entire image in our head or give simple snapshots motion.

Proximity
http://www.andyrutledge.com/gestalt-principles-3.php

   Proximity, uniform connectedness, and good continuation are essential for written communication. Without these a paragraph would be just random words on a page. Proximity helps us discern if certain things are in a group/together or not. If dots, like in the article, are placed close together then we perceive them as a group. While if they are farther apart they are separate groups. Even when the principle of similarity is put in to play if the dots are apart they are separated. An even stronger way to make connections is through uniform connectedness. For example, images or things in a box or connected by a line would immediately be seen as together. If elements are on a line or a curve then we relate them to each other. This would be the principle of good continuation being put in to effect. This principle is useful in a graph, grid or chart.

Figure/Ground
http://www.andyrutledge.com/gestalt-principles-1-figure-ground-relationship.php

   The principle of figure/ground is where we distinguish what is background and what is figure. This principle also helps us see an object or image as 2-dimentional or 3-demantional. Like a blurred image would be seen as a background or an image or graphic with added shadows and highlights would be seen as figure. Figure and ground can also become interactive with each other, a good example would be Veerle Pieters' Duoh! website where the cursor can interact with the graphics changing them from ground to figure and vise versa.

Common Fate
http://www.andyrutledge.com/common-fate.php

   The principle of common fate is where we relate things moving in the same direction and find them more relatable than things that are not moving. We can see this principle in real life like cars driving on the highway. All cars are moving in the same direction at roughly the same speed, but if a car changes lanes or another car gets on the highway it catches our eye and we can respond to it. In the world of design this could be as obvious as a slide-out menu or bar. We take notice of that movement as respond to it. It could be interpreted in a less obvious way in complete works of design and how the elements and pieces work together or "move" in the same "direction".

Wednesday, September 23, 2015

Name Plate Project

   
 Hello! This was a typography project for name plates which is my name shown 12 different ways and each way shows a different aspect of me. It started out as 20 things that represent me then 3 concepts in each resulting in 60 thumbnail sketches which then moved down to 12 that I would actually do on the computer.


 I learned quite bit on my first project. I learned about thumbnail sketches and that it's a good idea to have a lot of them. I learned how to make text an object and how to manipulate it. I also learned that peer review is really important. If I had to go back and change it I would probably redo the Homestuck one, second to last left, with a different design or modify the current one. However I really like how my comic and Gravity Falls ones turned out and wouldn't change them.


When I work on my next project I will keep in mind to use the typography skills I learned in this project and the importance of peer review. Overall, I had a lot of fun with this project, coming up with all the name designs to actually executing them in Illustrator. I am pretty pleased with the end result and learned quite a bit about typography and Illustrator.


Thursday, May 21, 2015

Hot Wheels Box

For this project we worked in teams, in my case it was Allyson and I. We didn't really have a leader and worked more like a team. So before we started the project we went over traits that make a good team which were trust, respect, and open communication, I think we displayed these wellWe then came up with an idea for Hot Wheels where we had different race tracks on the boxes and the would link up with each other to make one long track. We had some trouble finding the right template but we eventually found one that was close enough but it cost money so we just redid it as best we could.

While I really think our idea was amazing we didn't have much of a plan for what we wanted the tracks to look like. Which ended in us pretty much slapping on a track like road but I also think it was because we were pressed for time. We also, although a bit later in the project, thought " hey, we should probably have the name somewhere on the box. So, again being short on time, ended up sticking the logo, that Allyson had accurately recreated, somewhere on the template.
 Also in our idea making process we decided to have the choking hazard warning on the inside of the box as well as all seven of the box designs so you could "catch 'em all" but as we were stressed for time we couldn't make seven different designs. At first we were not sure if we could have the printing company print on both sides but when we got them they did so that was a plus.


I think the most challenging part of making this was the designs. We hardly planned any of the designs so it came out looking that way too. There also wasn't a lot consistency through out the designs we had made. For example, the Hot Wheels logo isn't on the finish template and where it's placed on the other two are different, the tracks also looked a bit different. Those are also a few thing I would change or go back and fix. However, I did like the way the logo turned out as well as the checkered board and the cone in the picture bellow even if I didn't get to print it.
Later in the project we decided that it would be cool to have stickers, so people could customize their tracks, but they didn't turn out very well and I didn't have enough time to finish them. Overall, I think this project could have turned out a lot better and a bit grander if we had done more planning and had a lot more time.

Friday, May 8, 2015

Invisi-Pill

 I started by making my template using the tutorial on Linda.com, making a die cut and bleed area. Then I added the basic colors I wanted to use and made the logo in a different document. After that, I it in the template and went online to get the nutritional facts and bar code. To get them in to Illusistrator, I imported them as vectors. Then I typed the warning and description along with the color bars and the top flap thing.

 For the label I also used a similar tutorial from Linda.com. I used a gradient from dark to light on the background and title to make it seem like it's fading away. I also put in the same nutrition facts, bar code, warning, title, and logo.
 Once I finished the template and label, I made the 3D mockups with the tutorial from Linda.com. I did it by making an outline of the bottle with the pen tool, then going to effect, 3D, 3D revolve to make the bottle. To make the box, I created a rectangle and then went to effect, 3D, 3D Extrude and Bevel. To get the panel art on the box I made each of the panles of the template into symbols and then went to map art to insert them onto the 3D box. I had the most trouble getting the label on the bottle, because no matter what I did, it wouldn't show up on the bottle.
 To fix the label problem I decided to just go with my logo and hope it showed up and it did. I turned out a little weird but I just went with it because I was sooooo feed up with the bottle.

Sunday, March 8, 2015

Tangled Up In Saul Bass

Base
To start making this poster I started off with a saturated yellow back ground and the title in Hitchcock font which I got from the internet. I then made the base of the sun with a polygon. To make the sun rays I used the pen tool.


Experimentation
Then I experimented a little bit with some gradients and I could not decide which one I wanted to do and I got a lot of feed back about it. After all that I realized that Saul Bass never used a gradient and I wanted in to be closer to his work so I got rid of all the gradients.


Sun Hair
After getting rid of the gradients I made the hair lines in the sun. I used the line tool to make them and did a bit of experimenting with where I put them and how many I put. But then I decided that having less lines and then I cleaned it up a bit.

More Sun
After deciding to not use a gradient I was got some advise from my neighbor and chose to go with different colored layers to represent sunshine. So to make the first layer I just copied the base of the sun and made it bigger. Then I chose a color and filled it with that color.
Even More Sun
After I made my first layer I made the other two by copying the layer I had previously made and making it bigger. Then I filled them with the same color but lighter.
Title When I made the title there was an arrow on the G so I customized it so it wouldn't.
Credits
To finish up my poster I added credits at the bottom in the same font as the title and same color as the background. The credit is the the directors of Tangled.

Friday, February 27, 2015

Custom Graphics Name


      To create this I typed my name in News Gothic MT then selected both and outlined them to make them shapes. Then I merged the i and the m as well as the M and A, after I edited the A using the direct select tool. Also using the direct select tool I edited the dot on the i and filled it with green.

Tuesday, February 3, 2015

The Kerning Game


Kerning is the spacing between two letters which you can change to make words, sentences, and paragraphs look better.

Thursday, December 11, 2014

Postcards


I really enjoyed doing these and had a lot of fun creating my own postcards. Designing them as well as doing them to be what I think is best really helped me get in touch with my creative side. I really did that with my Christmas card because I didn't follow any tutorials and got a little inspiration from another postcard that I saw. I also think It is the best looking one. The other two postcards had a tutorial that I followed. For the fall one I used a tutorial to put the pictures in the letters using a clipping mask. For my personal postcard I used the knowledge from the fall card to make my name. However, the background was from a tutorial that I found online which used Gradients and Gradient Overlay. I also redid my logo because the one I had before looked awful and I didn't think it represented me.  As for my brand i'm really not sure what it is. But I think I need to learn a bit more about what a brand is before I know what mine is.

Monday, November 10, 2014

Snail Shadow


In this tutorial I learned how to make a realistic shadow. First I chose an image, in my case a snail, then I selected it by using the magnetic marquee tool. After that I put it in the background of my choice, wood chips, by dragging and dropping. In order to make the shadow I followed the tutorial and made a layer copy. Then I used the transform tool and stretched it to take the form of a shadow. I made it a black to white translucent gradient to make it look like a shadow but since that didn't correspond with the background so I used the eyedropper tool to replace the white with a tannish color. Since the shadow didn't quite mach up with my snail I used the puppet warp to get it connected to my snail. Finally I used the burn tool to blend the background and snail together while adding a shadow as well.

Annika's Sky Line


          In this image there is a floating mountain in the sky with a large planet in the background. There is also a few pegasi in the background. I also added a light blue title in the corner of it.
  
   I started by using the also tool to select the mountain in a different picture with the lasso tool. Then I clicked the refine edge button to well refine the edge and get a cleaner edge. After that I cut out the bottom part of the mountain and moved it down to make the mountain longer. Then I put it in the photo of the sky and to make it look like it was floating I did the same thing I did to get the mountain on its own layer to the cloud that was behind the mountain. I also added a shadow with the burn tool on the cloud. Then I added a few masks to make it all blend together. Finally I added the pegasi and planet to the background using the same techniques I used to make the rest of it, also the title in the corner.
   I learned how to use the lasso tool to select a cretin thing or part of a thing and put that on a new layer. I also learned that you can ask your neighbor for help. If I did this again I would redo the shadow for the mountain and the clouds around the planet. This is because It doesn't look very good and the clouds around the planet are only on the edge.

         I will use the skills I learned while making this floating mountain like the refine edge tool or  lasso tool and put that into future work that I do. And overall making this was pretty easy and fun to do. I feel that I learned something very useful and I will probably use it a lot to get clean extractions.


I learned how to make it look like the mountain was behind the cloud in front by selecting the cloud with the lasso tool and hitting the refine edge tool. I also used this on the cloud in the back to the left so it was in front of the planet.

Friday, November 7, 2014

Creative Spheres

http://design.tutsplus.com/articles/how-to-create-an-ultra-glossy-flaming-ball-in-adobe-illustrator--vector-6024

Spheres symbolizes nature and have a global or earthy feel to them. They also can symbolize controlled chaos but at the same time they can represent unity, perfection, wholeness, and completion. Which is cool and unique that it can represent two opposites.

As for my work process I start by scetching an ideas that come to my mind then narrow down the options to a few spheres. After that I go in to the program, Ps or Ai, and start bringing my scetches to life. While doing this I start experimenting a little by chafing around the colors or messing with the shape. Then I choose the one i like the beast and focus one that one until I finish it. Finally I save it to my file.

While making these spheres I noticed a few differences between Ps and Ai.  Ps uses a bit map program, gradient overlap, and is a better use for photos. Ai uses fill and stroke, net layers, and to replaces gradients. In the Ps tutorial I learned how to use the gaussian blur to make it look like light is coming in. In the Ai tutorial I learned how to create a flame and use the blend tool. Both of these helped my understanding of each program a lot but I would like to learn more about creating a glow in Ps and softening a glow in Ai.


http://design.tutsplus.com/articles/how-to-create-an-ultra-glossy-flaming-ball-in-adobe-illustrator--vector-6024

Wednesday, October 22, 2014

Sphere


The top one is Illustrator and the one below it is Photoshop. I found that I like Photoshop better and easier than Illustrator. The shadow on the ball is a lot darker on the Illustrator ball and the shadow of the ball is outlined a bit more in Photoshop. The highlights are about the same, but the values are softer in Photoshop and darker in Illustrator. 


Tuesday, October 7, 2014

Logo Design


For my logo I used the shape of a square to represent progress. I used squiggles to represent my childish and artful side. The font I used is Stencil and I chose it because i thought it looked best on the square. I decided to used red and blue contrast colors because I like that contrast. Also blue used to be my favorite color, now my favorite color is red. During this project I learned how to make a drop shadow and squiggles in Illustrator. I also learned how to make 3D shapes, give an object perspective and curve an object, all done in Illustrator. I started making my logo by sketching some ideas that came to my head in my sketchbook and making the ones I liked in Illustrator. Once I did that I made an art board, testing out different variations of them. Then I picked the one I liked and thought would be the best. I think I did best on making the letters look like they'er floating by add in a drop shadow. But I if I could I would go back and apply at least one font effect to the text. I it would make it pop out more and bring a little more attention to the letters. But I need to work on experimenting because i really didn't do a lot of it when i needed to. 

Sunday, October 5, 2014

Name


In this tutorial I learned how to put more than one fill on an object. I think I did really well following the instructions and understanding them. I would try putting more fills and experimenting with them if I were to do it again. I would want to learn more about how to make different and awesome  looking gradients.

Wednesday, September 24, 2014

Google


Google was called Back Rub but they changed it to make people think that their company could handle a lot of data that other search engines couldn't. So far their is no internet information on the origin or creator of the original google logo. It was updated in 1998 and the colors were switched and an exclamation point was added around in 1999.

Then they hired Ruth Kedar to modify the brand logo.  Her first try she did'nt want to mess to much with the text. So she added a pattern between the two o's, with the colors used in the previous logo, to symbolize an infinite connection.
She then focused on one of the o's using an infinite pattern and adding a target. This was to show that the Google search engine was very precise an complicated but simple to use. 
In the next version their was a shift in the typeface and layout. The circles overlap and join with a target to show the globally targeted nature of the business. But she though it looked to much like the olympics logo. 
After that they tried adding a magnifying glass as one of the o's and a target in the other. They also changed the font to ITC Leawood. They added the Google colors as well. In another version of it they got ride of the target and put a smile in the magnifying glass.
In the last reiterations of the logo they switched up the colors and tried tilting one if the o's. They also added a touch of dimension and shading.