Showing posts with label Illustrator. Show all posts

Wednesday, September 23, 2015

Name Plate Project

   
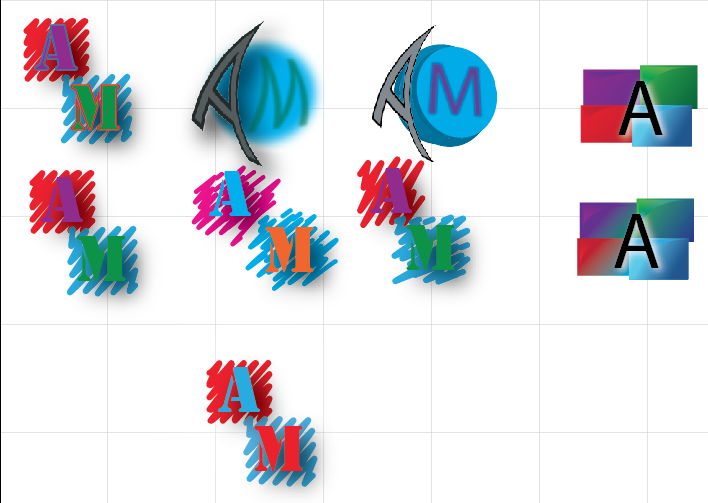
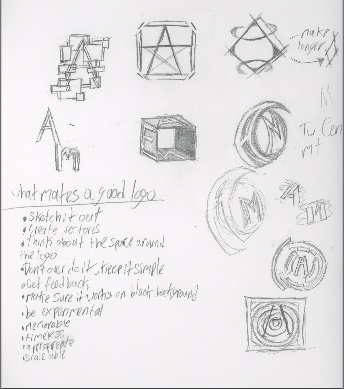
 Hello! This was a typography project for name plates which is my name shown 12 different ways and each way shows a different aspect of me. It started out as 20 things that represent me then 3 concepts in each resulting in 60 thumbnail sketches which then moved down to 12 that I would actually do on the computer.


 I learned quite bit on my first project. I learned about thumbnail sketches and that it's a good idea to have a lot of them. I learned how to make text an object and how to manipulate it. I also learned that peer review is really important. If I had to go back and change it I would probably redo the Homestuck one, second to last left, with a different design or modify the current one. However I really like how my comic and Gravity Falls ones turned out and wouldn't change them.


When I work on my next project I will keep in mind to use the typography skills I learned in this project and the importance of peer review. Overall, I had a lot of fun with this project, coming up with all the name designs to actually executing them in Illustrator. I am pretty pleased with the end result and learned quite a bit about typography and Illustrator.


Friday, May 8, 2015

Invisi-Pill

 I started by making my template using the tutorial on Linda.com, making a die cut and bleed area. Then I added the basic colors I wanted to use and made the logo in a different document. After that, I it in the template and went online to get the nutritional facts and bar code. To get them in to Illusistrator, I imported them as vectors. Then I typed the warning and description along with the color bars and the top flap thing.

 For the label I also used a similar tutorial from Linda.com. I used a gradient from dark to light on the background and title to make it seem like it's fading away. I also put in the same nutrition facts, bar code, warning, title, and logo.
 Once I finished the template and label, I made the 3D mockups with the tutorial from Linda.com. I did it by making an outline of the bottle with the pen tool, then going to effect, 3D, 3D revolve to make the bottle. To make the box, I created a rectangle and then went to effect, 3D, 3D Extrude and Bevel. To get the panel art on the box I made each of the panles of the template into symbols and then went to map art to insert them onto the 3D box. I had the most trouble getting the label on the bottle, because no matter what I did, it wouldn't show up on the bottle.
 To fix the label problem I decided to just go with my logo and hope it showed up and it did. I turned out a little weird but I just went with it because I was sooooo feed up with the bottle.

Friday, February 27, 2015

Custom Graphics Name


      To create this I typed my name in News Gothic MT then selected both and outlined them to make them shapes. Then I merged the i and the m as well as the M and A, after I edited the A using the direct select tool. Also using the direct select tool I edited the dot on the i and filled it with green.

Friday, November 7, 2014

Creative Spheres

http://design.tutsplus.com/articles/how-to-create-an-ultra-glossy-flaming-ball-in-adobe-illustrator--vector-6024

Spheres symbolizes nature and have a global or earthy feel to them. They also can symbolize controlled chaos but at the same time they can represent unity, perfection, wholeness, and completion. Which is cool and unique that it can represent two opposites.

As for my work process I start by scetching an ideas that come to my mind then narrow down the options to a few spheres. After that I go in to the program, Ps or Ai, and start bringing my scetches to life. While doing this I start experimenting a little by chafing around the colors or messing with the shape. Then I choose the one i like the beast and focus one that one until I finish it. Finally I save it to my file.

While making these spheres I noticed a few differences between Ps and Ai.  Ps uses a bit map program, gradient overlap, and is a better use for photos. Ai uses fill and stroke, net layers, and to replaces gradients. In the Ps tutorial I learned how to use the gaussian blur to make it look like light is coming in. In the Ai tutorial I learned how to create a flame and use the blend tool. Both of these helped my understanding of each program a lot but I would like to learn more about creating a glow in Ps and softening a glow in Ai.


http://design.tutsplus.com/articles/how-to-create-an-ultra-glossy-flaming-ball-in-adobe-illustrator--vector-6024

Wednesday, October 22, 2014

Sphere


The top one is Illustrator and the one below it is Photoshop. I found that I like Photoshop better and easier than Illustrator. The shadow on the ball is a lot darker on the Illustrator ball and the shadow of the ball is outlined a bit more in Photoshop. The highlights are about the same, but the values are softer in Photoshop and darker in Illustrator. 


Tuesday, October 7, 2014

Logo Design


For my logo I used the shape of a square to represent progress. I used squiggles to represent my childish and artful side. The font I used is Stencil and I chose it because i thought it looked best on the square. I decided to used red and blue contrast colors because I like that contrast. Also blue used to be my favorite color, now my favorite color is red. During this project I learned how to make a drop shadow and squiggles in Illustrator. I also learned how to make 3D shapes, give an object perspective and curve an object, all done in Illustrator. I started making my logo by sketching some ideas that came to my head in my sketchbook and making the ones I liked in Illustrator. Once I did that I made an art board, testing out different variations of them. Then I picked the one I liked and thought would be the best. I think I did best on making the letters look like they'er floating by add in a drop shadow. But I if I could I would go back and apply at least one font effect to the text. I it would make it pop out more and bring a little more attention to the letters. But I need to work on experimenting because i really didn't do a lot of it when i needed to. 

Sunday, October 5, 2014

Name


In this tutorial I learned how to put more than one fill on an object. I think I did really well following the instructions and understanding them. I would try putting more fills and experimenting with them if I were to do it again. I would want to learn more about how to make different and awesome  looking gradients.

Friday, August 29, 2014

Pencil Project


  I made all of these in Illustrator using tools like gradient, paint, shape, line, pencil, and stamp. At first trying to figure out all the tools was a bit frustrating but I got the hang of it. The first one was the simplest and easiest to make. It didn't take a lot of work and it was easy to follow the directions. The second and third ones were a bit harder and at first I couldn't figure out how to use the gradient tool. After getting some help it got easier and I found out new things about Illustrator. My three big take aways are that doing command j makes all selected pieces joined, the v key takes you to the select tool and command g/command shift g groups and ungroups.